- Call us: 01444 237070
- Contact Us
- Stores
- Sign In / Register
-
- Back
- Used Cameras
- Used Accessories
- Used Lenses
- Used Video
- Used Film Equipment
- Used Stock Alert
- Used Blank Test
- Sell or Part Exchange
- Used Clearance
- Recently Added Used Equipment
- Park Picks
- All Used Black Friday Deals
- Faulty
- Trade-In
- Blog
- New in
- Call us
- Contact us
- Stores
- Sign in
- Categories
- Tips & Inspiration
- Reviews
- News
- Events
- Features
- Buying Guides
- Competitions
Creative Portraits using Speedlights and Gels

Sometimes you see something a little bit different that just needs to be shared! Sony Ambassador Rob Pugh gave a seminar in our Burgess Hill studio on a concept that he came up with... while in B&Q!
Read on to see how Rob combines three different coloured gels to create amazing portraits with a unique look.
Finding photographic inspiration in unusual places
Okay… so admittedly B&Q is not the most unusual place in itself. But how often do you have a flash of photographic inspiration while getting paint mixed in a DIY store?
Rob noticed that mixing different coloured paints together resulted in a white paint, and got to thinking on how he could apply this principle to his portrait work.
How it works
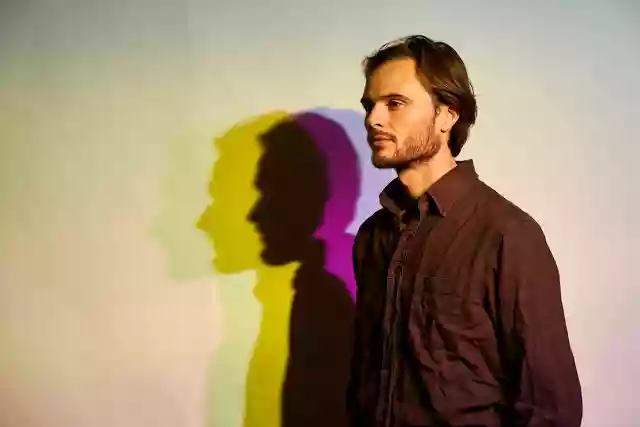
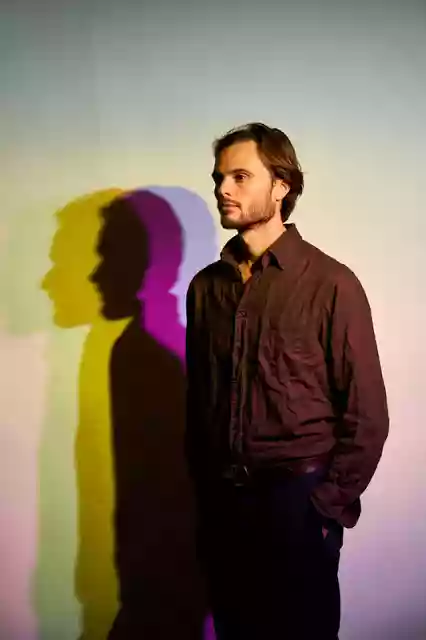
After experimenting in the studio, he found that mixing Magenta, Cyan and Yellow gels (on the front of speedlights) combined to give a white light when they fall on the subject’s face - in this case, our model for the day, Sam.
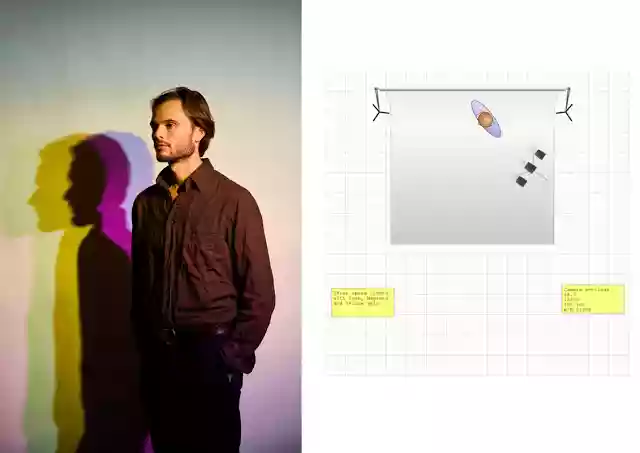
The lights need to come from ‘one’ main light source – in the studio demonstration, Rob lined up three speedlights on stands next to each other. As long as the lights are within a foot of each other, and aimed in the same direction, by the time the light reaches the subject’s face, they form a white light.

Using shadows creatively
The shadows, however, cast shadows coloured by the individual gels, darkening when the shadow from each light overlap. This gives you the result of a portrait lit seemingly under a normal white light, with different coloured shadows on the background, seemingly out of nowhere.
As an aside - speedlights are perfect for this as they are small light sources, meaning you can project distinct, defined shadows - as opposed to larger sources that would disperse the light source further.
Due to the nature of ‘additive’ light mixing (the result of which is the white light hitting the face), it’s important that the lights are placed together as if they were coming from a single light source. If this is not done, then the light hitting the face may be multi-coloured. This can still give interesting results in itself, but is a standard approach to using coloured flash that does not stand out from the crowd.
Technical information
- Set your White Balance manually to 5600K - Auto white balance will try and compensate to 18% grey and change the colours to pastel shades
- Keep your aperture at about f/6.3 to keep the shadows defined
- Know your sync speed and don't shoot above this* - on Sony this is 1/250th second, but you should check specifically to your camera model
- Use lowest ISO possible
(*sync speed is the max shutter speed your camera can fire at and still capture the whole flash - if you shoot above this you'd know as you would get a black 'band' appear on the image)

About Sony Ambassador Rob Pugh
Rob Pugh is a wedding and portrait photographer who shoots on Sony. In fact, he is a Sony Ambassador, and during his talk we were fascinated to hear how Rob would primarily shoot weddings using just two prime lenses (50mm and 35mm f/1.4).
‘That isn’t enough’, we hear you cry… Well, quite! But what Rob does is use Sony’s clever feature to switch in-camera to the APS-C sized sensor. This offers extra reach due to the crop factor, while effectively doubling the amount of lenses available. And while you do lose some resolution with this approach, on the Sony a9, this still gives a resolution of 17MP – more than enough for most scenarios!
You can see more of Rob’s work on his website.
Kit used:
Sony a7R III
Zeiss Batis 85mm f/1.4
3 x Speedlights Magmod adapter kits for speedlights - to attach the gels
You may also like:
Essential Flashgun Lighting Tips with Sony
Luxury Yacht Photography - Lighting with Elinchrom
Cityscape tips - capture the city in a whole new light
How Rotolight are leading the LED revolution
Share this post:
By Ashley Laurence on 07/12/2018

Trade in your old equipment
Fast and easy trade in service ensures your old gear is collected efficiently and you are paid quickly! It's very simple to trade in your unwanted photography gear. Just head over to our dedicated Sell or Part Exchange page, fill out the details, and we'll get back to you with an offer for your old gear. Take the cash, or put it towards the cost of your new gear. It's up to you! Find out more
sign up to the newsletter
Keep up to date on the latest photography news, events and offers. Sign up now